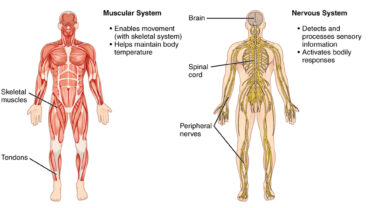
Histological examination of the structures of the body
METHODS OF EXAMINATION (histological examination)
The structures of the body may be histologically examined in various ways.
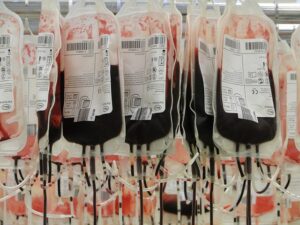
Fluid and Semi-Fluid Structures
If, as in the case of blood, we are dealing with cells suspended in a fluid we may examine it via:
- ln the Fresh State
- After Hardening and Staining
- ln the form of a Cover-Glass Preparation.
In the Fresh State (histologically examined)
A small drop of the fluid is placed upon the slide, and a cover glass applied to it. When it rapidly spreads to the edge cf the cover, completely filling the space between it and the slide. Any superfluous fluid should be removed with bibulous paper. Otherwise, the slip is liable to float from its position if the stage of the microscope be slightly inclined.
After being examined thus, the specimen may be stained or subjected to the action of reagents by the method of irrigation. A drop of the staining fluid is placed at the side of the cover slip touching its edge. And at the other is placed a small piece of bibulous paper. As the fluid beneath the cover passes into the bibulous paper on the one side, it leaves space for the entrance of the staining reagent on the other.
After Hardening and Staining
If, however, it be desired to make a permanent preparation for histological examination, the above method will not suffice. The cells require “hardening” previously, i.e., they require immersion in some fluid. It will so fix their present state, that they will not in a short time show evidence of physical alteration. Hayem’s fluid is very commonly employed for “fixing” blood corpuscles.
The following is its composition: Sadie chloride (1 gram), Sadie sulphate (5 grams), Corrosive sublimate (0.5 gram), and Distilled water (200 CC).
Step 1 of histological examination
The blood is either run direct from the body of the animal, or after as short an interval as possible (i.e., before coagulation), into an excess of the fluid (i.e., 100 of fluid to 1 of blood). It is then stirred up with a glass rod so as to thoroughly mix the cor puscles with the hardening reagent. Twelve to twenty-four hours are required to complete the hardening process.
Step 2 of histological examination
The corpuscles should be stirred up frequently during this time. Afterwards the supernatant fluid may be decanted from the corpuscles, which will have settled to the bottom, and the vessel be refilled with water, in order to remove the superfluous salts. This process may be repeated more than once, in order that the corpuscles may be thoroughly washed.
Step 3
After filling the vessel with water for this purpose, the corpuscles are stirred up with a glass rod and then allowed to settle to th bottom again before the fluid is decanted for histological examination. If it is intended to stain the corpuscles, a weak solution of the reagent may now be added, and after again stirring them the whole may be left for a few hours. At the end of that time examine a drop of the fluid, taken with a pipette from the bottom of the glass. If the staining has taken place (and in the case of blood this is rapidly decided by noting the condition of the nucleus), pour off the supernatant fluid.
Final Step 4
The residue may now be treated in the following way, with a view to preservation. Pour melted glycerine jelly upon it, and stir up the whole rapidly with a glass rod, so that the corpuscles are evenly diffused through the jelly. Now transfer to a glass tube which has been in readiness ; cork, and cool quickly under the tap. By this method of rapid cooling the corpuscles are retained scattered throughout the medium, which is more favourable to their preservation than if they are allowed to accumulate at the bottom of the tube.
In this way blood, or other cells suspended in fluid, can be kept almost indefinitely. All that is required when preparations are to be made from it being that the tube should be placed in a vessel containing hot water, until the glycerine jelly melts. A glass rod is then dipped a little way into it, and a small drop placed upon a slide and covered. The jelly rapidly sets, and we have a permanent stained preparation.
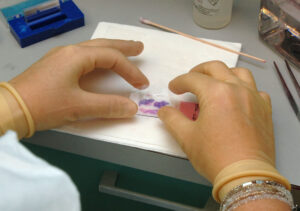
In the form of a Cover-Glass Preparation
The method of preparati0n of a cover-glass specimen may be shortly described as follows:
Step 1 of histological examination
A small drop in the case of a fluid, or a scraping if of a semi-solid structure, is placed between two cover-glasses. These are gently pressed together between the thumb and fore finger. And allowed to slide on each other, with the object of causing a thin film to be spread out upon the surface of each. They are then separated by sliding one completely off the other, and are placed, film side upwards, on the table to dry. This takes a short time (varying with the temperature).
Step 2 of histological examination
The film on either cover may then be examined as it is, or after staining with some reagent such as methyl blue. The latter can be carried out in either of two ways. The cover slip may be placed film side downwards on the surface of a solution of the reagent in a watch glass; or a large drop of the solution may be placed on the film side of the slip, and, by means of a needle or other instrument, smeared over its surface, care being taken that the film itself is not scratched.
Step 3
The slip is then left to stain for a variable time-in the case of methyl blue I to 2 minutes being sufficient. It is then seized with a pair of fine forceps, and gently laved in water to remove the superfluous stain. When all has been washed away, except that taken up by the film itself, the cover-glass is dried with slips of bibulous paper to as great an extent as possible without touching the film. If the glass be held with its plane vertical or sloping, a drop of water accumulates at its lower edge, from which point it is easily and safely removed.
Step 4
The non-film side can of course be completely dried. The cover-glass is now again left film side upwards to dry, and subsequently mounted in Canada balsam, or other mounting medium. This is done by either placing a small drop of the balsam on the film-side of the cover slip and inverting it over the slide, or first placing the balsam on the slide, and then covering with the slip. Gentle pressure on the glass with a needle causes the drop to rapidly extend between the apposed surfaces.
The specimen, particularly when not stained, is sometimes mounted without the intervention of any medium. The cover slip is placed film downwards on a slide, and fixed in position by means of gummed paper.’
Histological Examination of Solid Structures
The Solid Structures of the Body are for the most part histologically examined in the form of sections. Sometimes, however, when the tissue takes the form of a thin membrane, such as the
omentum, no cutting is required. The tissues may also be examined in a dissociated condition, i.e., one in which their elements have been more or less separated from each other.
Dissociation of Tissues
The process of dissociation is usually completed by teasing with needles on a slide. This may be all that is required in the case of fresh tissue, such as the nerve of a frog, in which the elements are readily separable from each other. In the case of many others, however, previous prepara tion is necessary, in order to weaken the coherence of their parts.
Step 1 of histological examination
When a tissue is to be examined after teasing alone, it is, after removal from the body, placed upon a slide and teased with needles. It can be done either in a drop of the serum of the animal from which it has been taken, or some other neutral indifferent fluid. The object in using an indifferent fluid is that the tissue may not be altered in its histological characters. Either normal saline, or the serum of blood, is usually employed for this purpose ; and of these two, the more generally used is the former, as it can readily be kept at hand. The strength of normal saline solution is 6 of sodium chloride (NaCI) to 100 of water (H2O), or 6 in 1000.
Step 2 of histological examination
After the tissue has been sufficiently teased to separate its constituent fibres from each other. As in the case of nerve and muscle, or to break up the cohesion between its individual gland cells, as in the case of such an organ as the liver. It may be examined after applying a cover-glass. If it be desired to subject it to the action of staining or other reagents, these can then be conveniently applied to it by the method of irriga tion. Such a preparation is of course intended for immediate examination only.
Step 3 of histological examination
If it be desired to make a permanent specimen, some method of previous hardening before dissociation is adopted. The piece of tissue may, for instance, be placed for a few hours in a weak solution (¼ to ½ per cent. of osmic acid) for this purpose. At the end of that time transferred in bulk to some staining fluid, such as picro-carmine, in which it is kept till the stain has pene trated it ; the length of time required depending on its size and porosity.
Pieces of sciatic nerve of frog, or very small portions of liver, will require about twelve hours in a weak solution. A small fragment is then placed upon a slide, teased with needles, and mounted in glycerine or some other medium. But, in many cases, mere teasing is not sufficient to dissociate the tissue elements from each other. They are bound together too closely either by connective tissue or cement substance, which requires to be first dissolved.
Important Steps for Dissociation of Tissues
This is effected by immersion for a variable time in what is termed a “dissociating” fluid, of which the five following are those most commonly in use:
lodised Serum for histological examination
I.e., blood serum containing iodine in solution. A sufficient quantity of crystals of iodine should be dissolved to give the solution a light brown tint. Small pieces of tissue ¼th of an inch in diameter require a day or two in this fluid before dissociation is attempted.
Dilute alcohol (alcohol 1 in 3)
Ranvier’s one-third alcohol is perhaps the most generally useful. It may be prepared by mixing one part of methylated spirit with two of water. In the case of small pieces of tissue rii to ½-in. in thickness, one or two days are sufficient. The time varies in the case of different tissues, some requiring a much longer period. The pieces are handled and examined from time to time.
Hydrochloric Acid in water
It varying in strength from 5 to 10 percent., according to the rapidity with which it is required to act. This is useful for dissociating the convoluted tubules of the kidney from each other. Small pieces not more than ¼-in. in thickness may be placed in different strengths of the solution, and examined from day to day, until they are of the requisite degree of looseness.
Caustic Potaslz
Caustic Potaslz (of the strength of 1 of caustic potash to 3 of water) may be used for destroying the connective tissue between the fibres of unstriped and cardiac muscle, to facilitate the separation of the muscle fibres by teasing. It acts in a few minutes, and considerable care is required to avoid the destruction of the whole tissue. Water must not be added, or the muscle cells pass into solution.
Gastric and Pancreatic Digestion for histological examination
They are sometimes used for rendering elastic fibres (which are unaffected by them) more easily separable from each other, as in the case of ligamentum nuchce of ox. Here we have to deal with a network of elastic fibres firmly bound together by ordinary white fibrous tissue, which becomes dissolved by the process.
After the tissue has been subjected sufficiently to the action of the dissociating fluid, it may be teased and examined as it is. It is, however, preferable to place it in bulk for twelve to twenty
four hours in ½ per cent. of osmic acid, and afterwards to stain it in picrocarmine solution, or other reagent, before proceeding to make a specimen from it. Elastic fibres need no treatment to ensure preservation.
Final Step
When the tissue takes the form of a thin membrane, it may be examined fresh in normal saline, or after the addition of some staining or other reagent. If it be desired to make a permanent preparation, it is hardened previously; then stained (or the two processes may sometimes be conducted together) and mounted in glycerine, balsam, or other mounting medium.
Most tissues are, however, examined in the form of sections, cut by hand, or more usually in a microtome.
Before cutting, nearly all tissues require “hardening.” Some, such as bone and tooth, require softening ; or these latter may require both. If the soft parts about them are to be preserved. When a tissue has been hardened or softened, as the case may be, and is ready for cutting. It requires to be “embedded” in some sub stance that will support it during the process. The tissue may be stained “in bulk ” before being cut, or the sections may be stained afterwards. They arc then mounted on a slide in some mounting medium.
Important points to remember duirng histological examination
- Always handle the cover as much with forceps as possible in preference to holding it with the fingers.
- See that the stained film is completely dry before mounting in balsam. If it is not, an emulsion will be formed by the mixture of the resin with the water.
- The drying process may be quickened by moving the cover-slip, held by its edge in a pair of forceps, with the film-side uppermost, over a Bunsen burner, at some distance of course from the flame. It should not be allowed to get heated to much beyond the body temperature. When there is no occasion for hurry, it is safer to allow the film to dry naturally.
- If at any stage of the process the student becomes doubtful as to which is the film side of the slip, he should draw the point of a needle over each. Only the film side shows the scratch caused by the removal of a line of material.